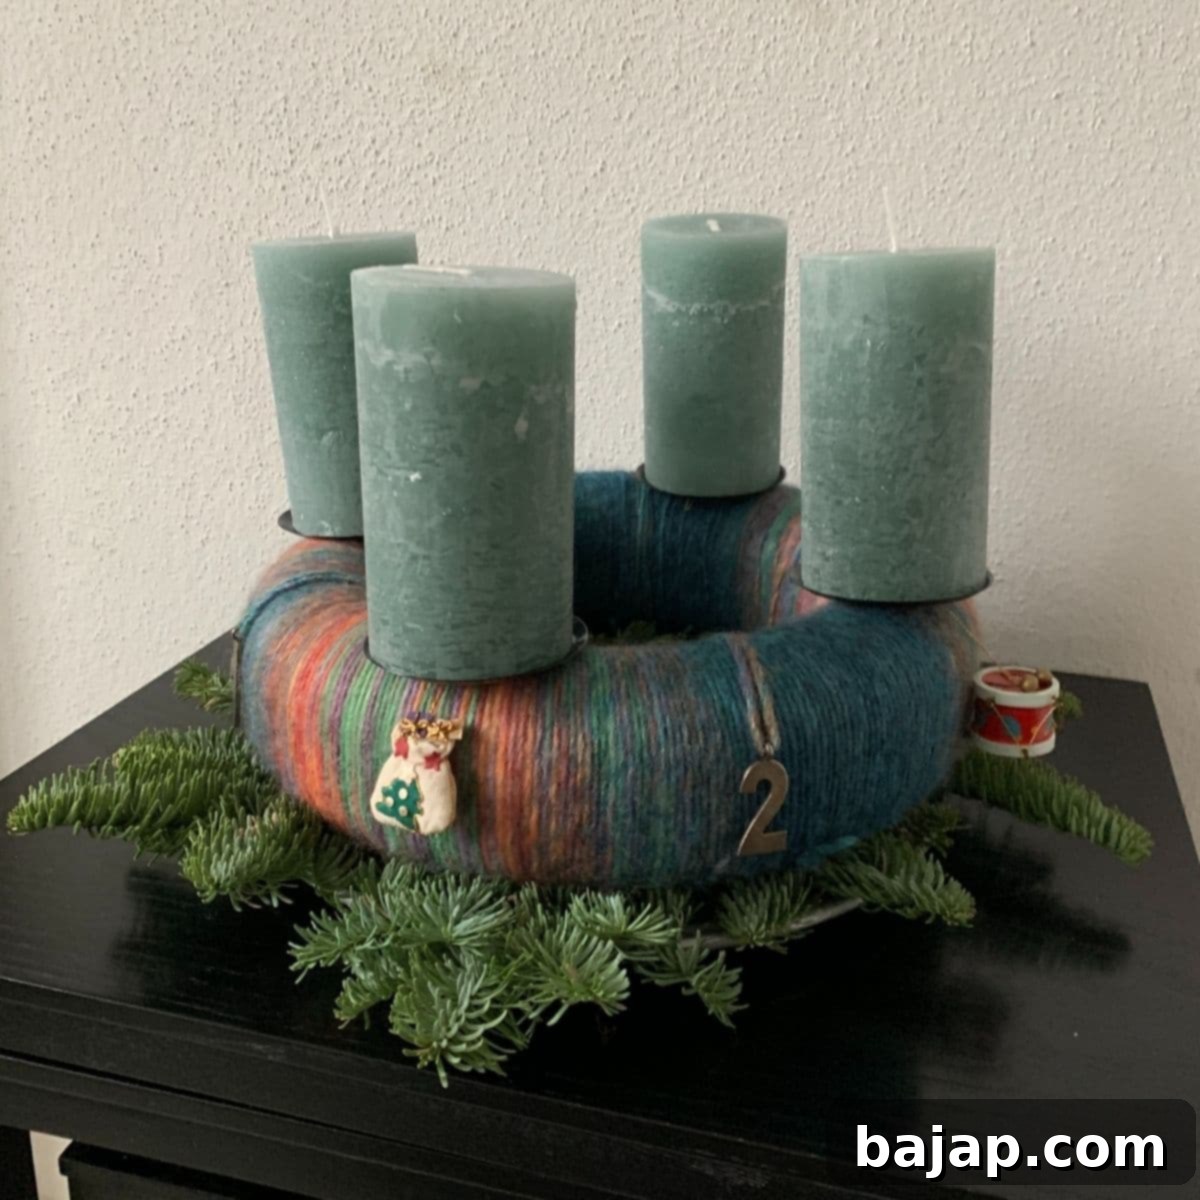
How to Make a Stunning DIY Woolen Advent Wreath for a Unique Christmas Decoration
As the magical days of late November begin to shorten and the crisp air signals the approach of winter, a cherished annual tradition begins for many: crafting the Advent wreath. For me, it’s a particularly beautiful time of year, filled with anticipation and the joy of creation. Just as I love to curate a fresh menu for every Christmas dinner, I find immense pleasure in designing a unique Advent wreath each year, different from the last. It’s an opportunity to infuse our home with fresh holiday spirit and a personal touch.
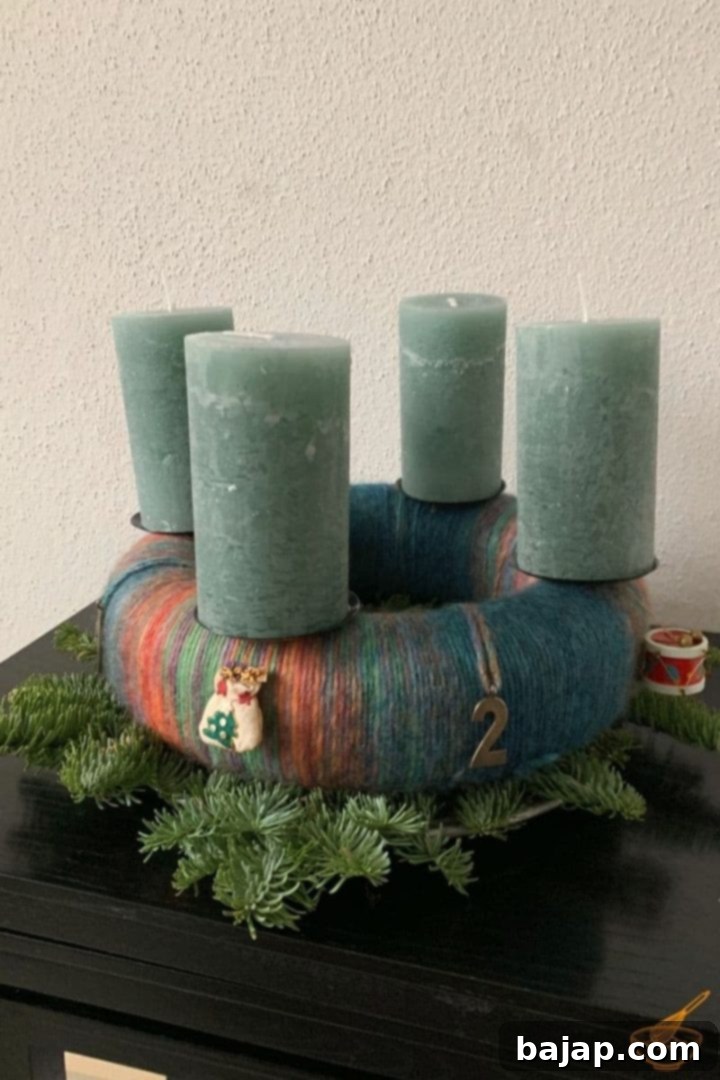
I’m simply not a fan of mass-produced, store-bought Advent wreaths. There’s something truly special about a handmade piece that reflects your personal style and effort. Each year, my family looks forward to seeing what new DIY Advent wreath I’ll come up with. Some years, it might be an elegant arrangement of brushwood; other times, a stylish display on an étagère. But in 2020, I ventured into a new realm of creativity: an Advent wreath made entirely out of wool.
Crafting a woolen Advent wreath was an idea that had been brewing in my mind for quite some time. Last year, I finally dedicated the time to bring this vision to life. To my pleasant surprise, the process turned out to be far less complicated and time-consuming than I had initially expected. The result was a beautifully soft, uniquely textured wreath that added a wonderful warmth and charm to our holiday decorations. If you’re looking for a distinctive and heartfelt way to celebrate the Advent season, a DIY woolen wreath is an excellent choice. It offers a cozy aesthetic that traditional wreaths sometimes miss, making it a perfect centerpiece for your festive home.
In this comprehensive guide, I’ll share my step-by-step process for creating your own stunning woolen Advent wreath. You’ll find that it’s an enjoyable and rewarding craft, perfect for getting into the holiday spirit. Let’s gather our materials and begin this delightful crafting journey!
[feast_advanced_jump_to]
🛠 Essential Equipment for Your Woolen Advent Wreath
Before we dive into the creative process, let’s ensure you have all the necessary supplies. Gathering everything beforehand will make your crafting experience smooth and enjoyable. Here’s a detailed list of what you’ll need:
- Styrofoam Ring(s): You’ll need either two half-rings or one full styrofoam ring with a diameter of approximately 11.81 inches / 30 cm. Styrofoam provides a lightweight yet sturdy base that is easy to work with when wrapping.
- Florist Wire: This flexible wire is crucial for securely fixating the styrofoam rings together if you’re using half-rings, ensuring they don’t slip during the wrapping process.
- U-shaped Pins: These small pins are perfect for attaching the ends of the yarn to the styrofoam discreetly and securely. They blend in well and hold the yarn firmly in place.
- Yarn: Choose 1-2 skeins of yarn in the color(s) of your choice. The amount needed depends on the thickness of your yarn and how tightly you wrap it. A medium-weight yarn (like worsted or aran) often works best for good coverage and a plush look.
- Candleholders with Mandrels: You’ll need four candleholders designed for insertion into a wreath. The mandrel (spike) ensures your candles are stable and safe.
- Small Ornament Decorations or Numbers 1-4: This is where you can personalize your wreath! Choose 4-8 small ornaments that complement your chosen yarn color, or traditional numbers 1-4 to mark each Advent week.
- Pillar Candles: Four pillar candles are needed. Select colors that beautifully complement your yarn. You can opt for traditional Advent colors (purple, pink, white) or a modern palette.
- Decorative Plate: A sturdy decorative plate is essential for placing your finished Advent wreath on. It protects your surfaces and adds to the overall presentation.
- Fir Brushwood: A few sprigs of fresh fir brushwood will not only provide a natural base between your decorative plate and the wreath but also fill your home with a delightful, festive scent.
🪡 Step-by-Step Instructions: Crafting Your Woolen Advent Wreath
Now that you have all your materials ready, let’s begin the exciting process of crafting your very own woolen Advent wreath. Follow these instructions carefully for a beautiful and durable result.
Step 1: Preparing the Styrofoam Base
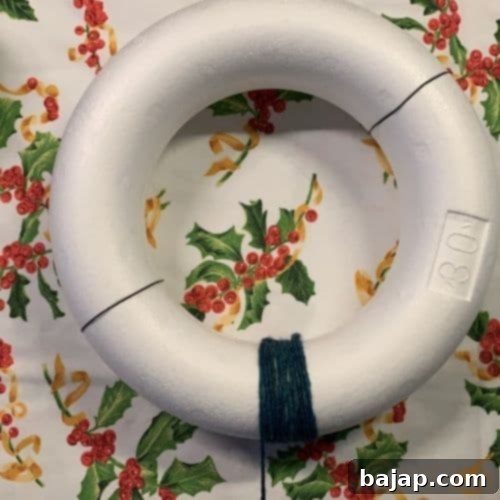
If you’re using two half-rings, your first task is to secure them together. Take your florist wire and firmly wrap it around opposite sides of the two styrofoam halves, joining them into a complete circle. These two initial wires are generally sufficient to provide enough stability for the initial wrapping. Avoid closing them too tightly at this stage, as you will need to gradually move and eventually remove them later. If you are using a single, full styrofoam ring, you can skip this wiring step.
Step 2: Attaching the Yarn
Next, take your chosen yarn. Sometimes finding the end of a new skein can be a mini-adventure in itself! Once you’ve located it, create a small loop at the very end of the yarn. Use a U-shaped pin to firmly attach this loop to the underside of your styrofoam wreath. This hidden attachment point ensures a clean start and keeps the end of your yarn secure as you begin wrapping.
Step 3: The Art of Wrapping the Wreath
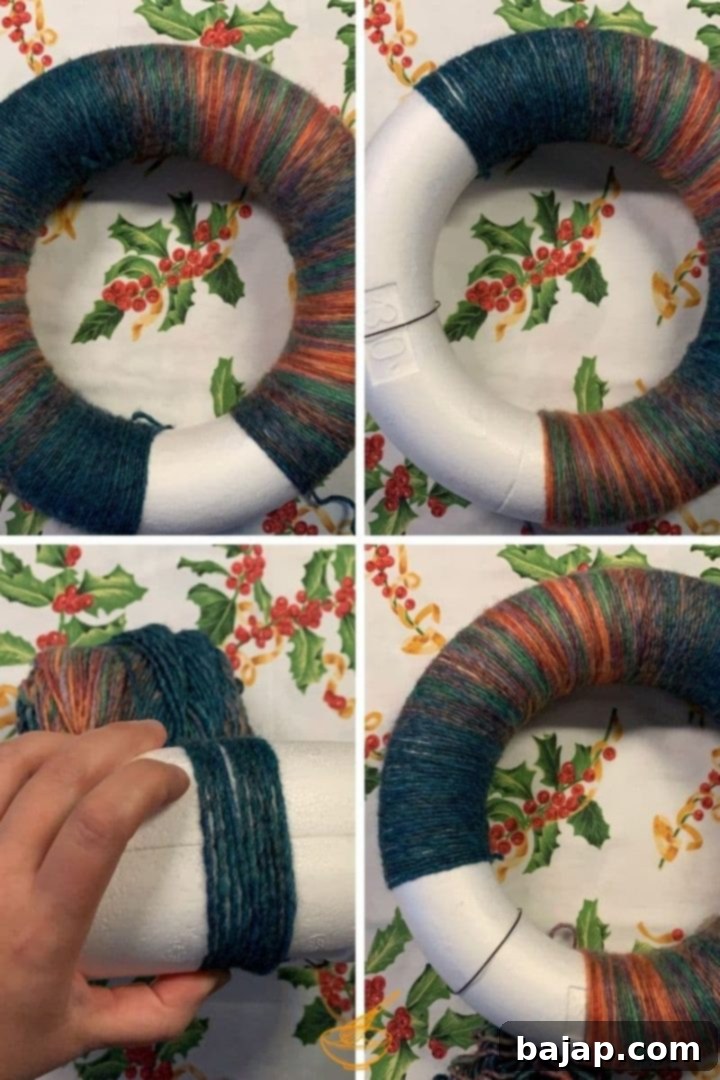
This is where your wreath truly begins to take shape! The key to a professional-looking woolen Advent wreath is tight and firm wrapping. As you wrap the yarn around the styrofoam, ensure that each strand is pulled taut. If the wrapping is too loose, the underlying styrofoam might show through, which can detract from the finished appearance. Furthermore, a loosely wrapped wreath might shift and become unstable over time. After each full rotation or every few wraps, use your fingernail to gently push the wrapped threads together. This technique helps to eliminate any small gaps, keeps the yarn strands straight, prevents twisting, and ensures a dense, even coverage.
Step 4: Managing Yarn Tangles and Continuing the Wrap
One common challenge you might encounter while wrapping is tangled yarn, especially if you’re working with a large skein or multiple colors. Don’t worry, this happens to the best of us! When the yarn gets tangled and makes wrapping difficult, it’s perfectly fine to pause. Simply cut the tangled wool thread, secure the end you just cut with another U-shaped pin to the bottom of the wreath, and then take a moment to untangle the rest of your skein. Once it’s smooth again, create a new loop at the fresh end of your yarn, attach it with a U-shaped pin to the underside where you left off, and continue wrapping. Always ensure new attachments are made on the bottom of the wreath to keep them discreet.
Step 5: Removing Floral Wire and Finishing the Wrap
As you progress with wrapping and the wreath gains more stability from the layers of yarn, you can gradually remove the florist wire (if you used it). If the structure feels sturdy enough after you’ve wrapped a significant portion, carefully snip and remove the first wire. For the second wire, you might push it along the wreath as you wrap to avoid interference, eventually removing it completely once the entire wreath is covered. Once you’ve wrapped the entire styrofoam base, ensuring no gaps or styrofoam are visible, cut the yarn. Again, make a small loop at this final end and secure it firmly to the bottom of the Advent wreath with a U-shaped pin. Double-check all pins to ensure they are pressed in securely and won’t snag.
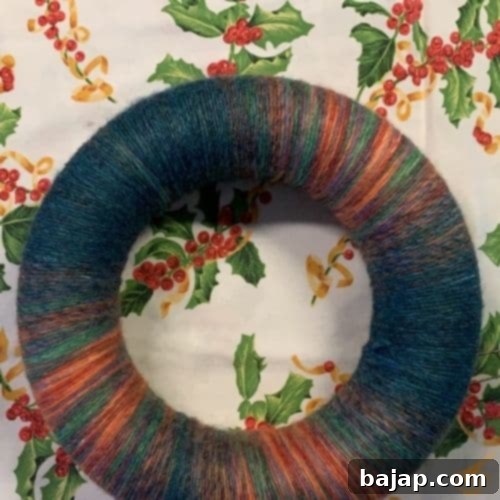
Well done! Congratulations on completing the core of your stunning woolen Advent wreath!
Step 6: Adding the Candles and Personalizing Your Decorations
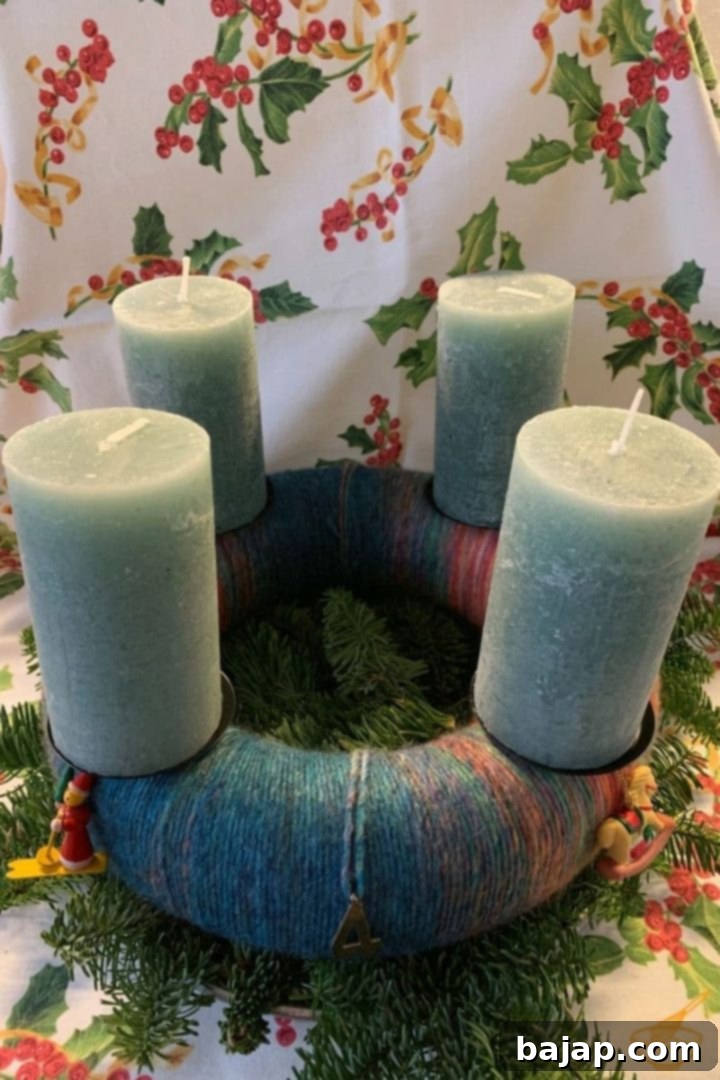
With your beautifully wrapped wreath as the foundation, it’s time to bring it to life with candles and festive decorations. Start by preparing your candles and candleholders. Carefully place each pillar candle onto its respective candleholder and set them aside. For this particular Advent wreath, I chose a modern approach using four teal-colored candles. This gives the wreath a fresh, contemporary look, diverging from the classic Advent wreath imagery that typically features three purple candles and one pink one.
If you prefer a more traditional aesthetic, I recommend selecting a yarn that incorporates shades of pink and purple, or simply opting for pillar candles in these traditional colors. For those curious about the rich history and symbolism behind Advent candle colors, you can find a detailed description here. Alternatively, if you’re a fellow teal enthusiast, consider a combination of three teal candles with one white candle for a touch of serene elegance.
Now, let your creativity shine as you decide how to decorate your woolen Advent wreath. My primary goal for this wreath was to maintain its elegant simplicity, allowing the meticulous wrapping to be the star of the show. After all, a fair amount of effort went into wrapping that wool!
For decorations, I lovingly rummaged through some vintage wooden Christmas tree ornaments from my childhood – these always add a special sentimental touch. I also found a set of numbers (1 to 4) left over from a previous Advent wreath project. I chose four distinct, adorable wooden pendants, each already equipped with a convenient hanging ribbon. This made attachment incredibly easy: I simply looped the ribbon around the candle holder spike before inserting it into the wreath. This method created a seamless and charming integration of candles and complementary decorations, adding character without overwhelming the design.

Step 7: Adding Advent Numbers (Optional)
While entirely optional, I personally love the idea of incorporating numbers onto the Advent wreath to mark each week. I decided to place them between the candles. To do this, I prepared four identical lengths of yarn. I threaded a single strand through the eyelet of each number and then secured the yarn end with a U-shaped pin to the bottom of the Advent wreath. This allowed the thread to run discreetly along the wreath, from the inside out, almost disappearing due to the matching yarn color. This subtle addition beautifully marks the progression of Advent without cluttering the elegant design.

Step 8: The Grand Finale: Displaying Your Wreath
To beautifully set the scene for your stunning woolen Advent wreath and enhance its festive presence, take your decorative plate and arrange fresh fir branches evenly across its surface. Allow some of the fir brushwood to gently protrude at the edges – this not only adds a touch of natural charm but also ensures its wonderful scent can waft through your home. Once the fir base is prepared, carefully place your finished woolen Advent wreath on top of it.

Voila! Your exquisite, handmade woolen Advent wreath is now complete and ready to bring warmth and joy to your home throughout the holiday season.
And thanks to the fresh fir brushwood, a wonderful, natural aroma will gracefully spread throughout your entire space! Mmm, absolutely delightful! Crafting your own Advent wreath is not just about creating a decoration; it’s about making memories and infusing your home with personal charm. Did this post ignite your crafting spark? Do you adore enchanting your home with festive Christmas scents? If your answers are a resounding yes, then be sure to explore Lynn’s fantastic DIY post! There, you’ll discover a wonderful tutorial for a homemade orange garland, another perfect way to add natural fragrance and beauty to your holiday decor!
Related Holiday & Craft Ideas
If you loved creating your woolen Advent wreath, you might be interested in exploring more holiday DIY projects and festive decorating tips. Dive into these related posts for further inspiration to make your Christmas season truly special:
- How to Decorate a Real Christmas Tree in 11 Easy Steps
- 25 Amazing Ready-made Advent Calendars for Grownups
- These Homemade Advent Calendars for Grown-Ups Will Put You in the Proper Christmas Mood
- 8 Christmas Tablescape Ideas for a Festive Christmas Feast
