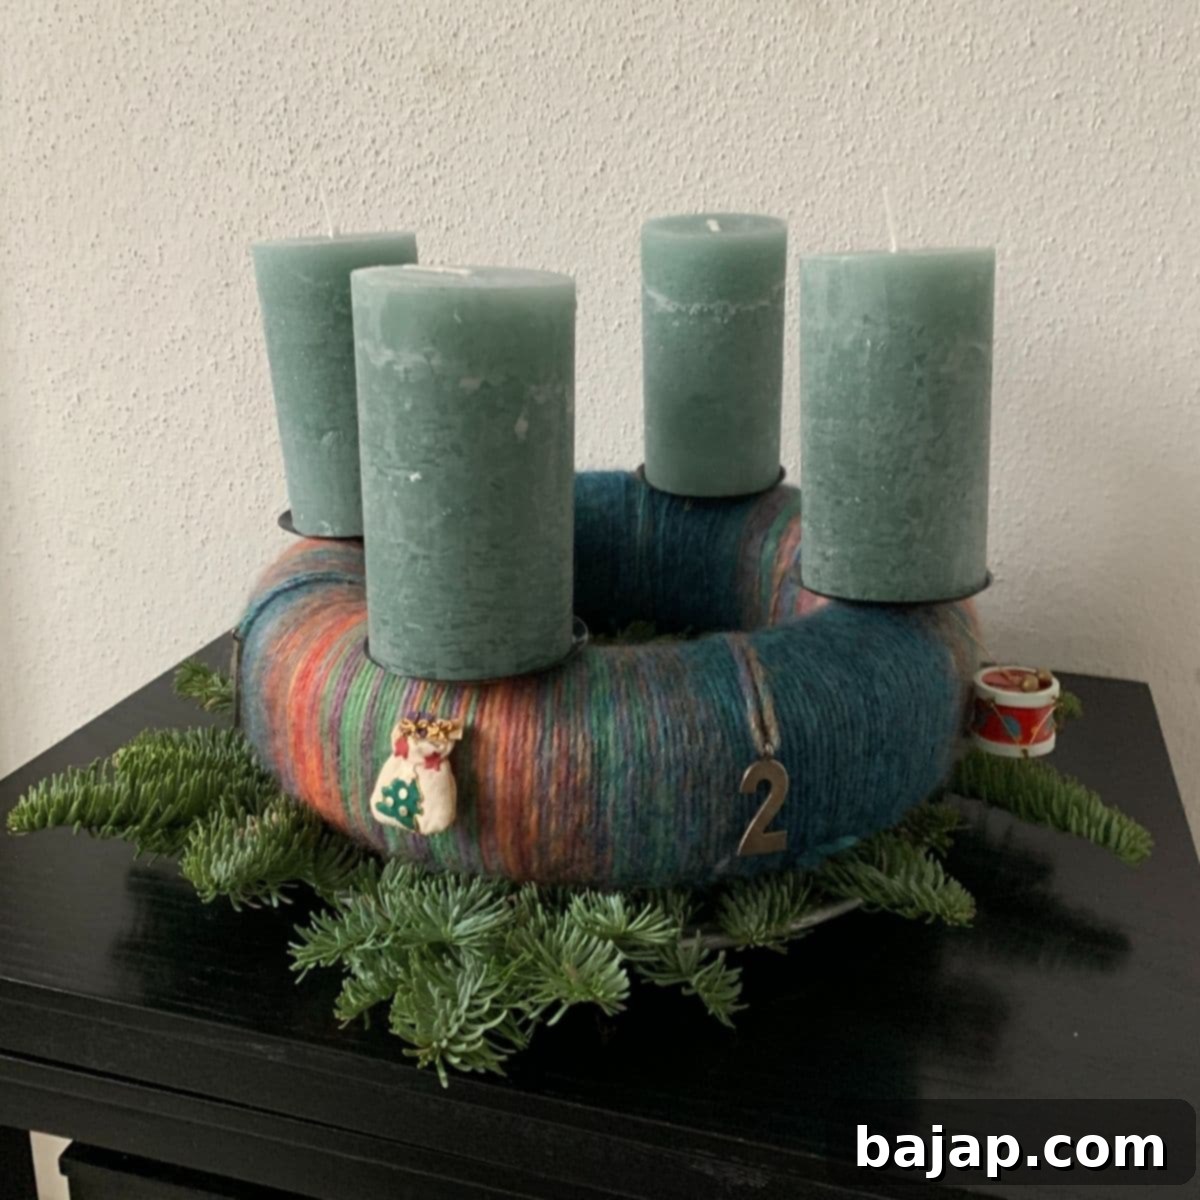
DIY Woolen Advent Wreath: A Step-by-Step Guide to Crafting Holiday Cheer
As the crisp air of late November settles in, bringing shorter days and longer nights, a magical transformation begins in many homes. For me, it’s the cherished tradition of crafting a unique Advent wreath, a symbol of hope and anticipation as we journey towards Christmas. There’s something truly special about a handmade Advent wreath that a store-bought version can never replicate – the personal touch, the joy of creation, and the unique story each one tells.
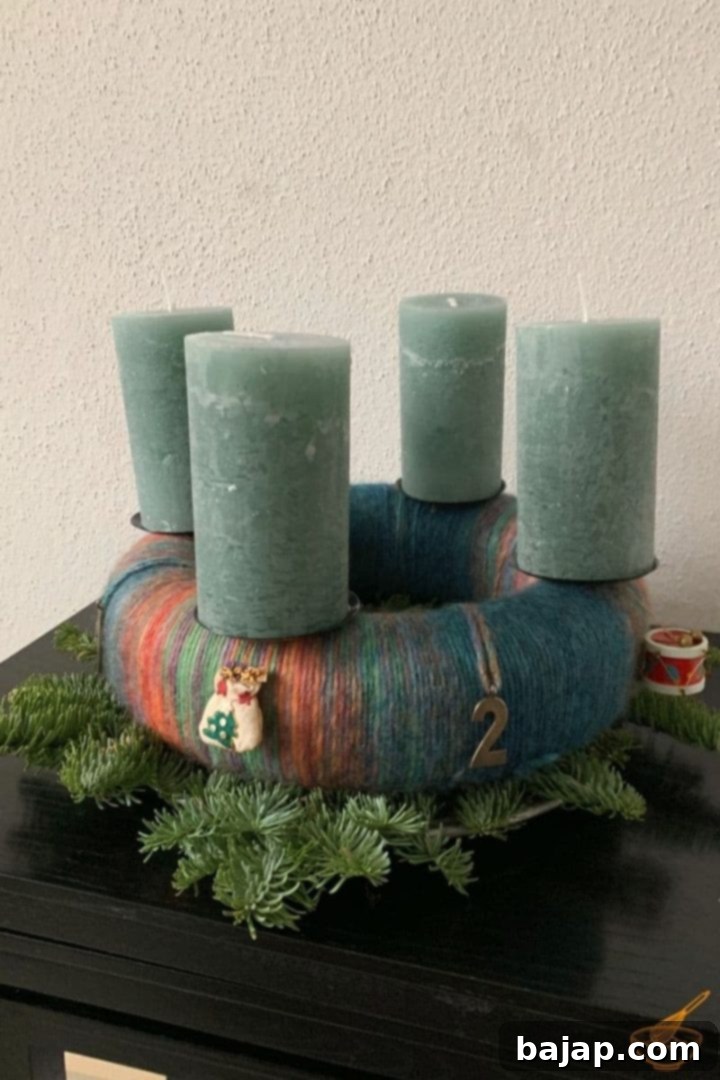
Just as I meticulously plan a new festive menu for every Christmas dinner, I embark on the delightful challenge of designing a distinctive Advent wreath each year. This annual ritual allows me to explore new creative avenues and ensure that no two Advent wreaths are ever alike in my home. The appeal of a DIY Advent wreath lies in its versatility and the endless possibilities it offers for personalization.
Over the years, I’ve crafted various styles: some intricately bundled with natural brushwood, others elegantly arranged on tiered étagères. But last year, I finally pursued a long-held desire: to create a stunning Advent wreath made entirely out of wool. This particular Christmas craft seemed daunting at first, imagining hours of intricate work. However, much to my pleasant surprise, the process of making this unique woolen Advent wreath was far less complicated and considerably more enjoyable than I had anticipated. It’s a wonderful project for adding a cozy, modern, and personal touch to your holiday decor, creating a focal point that’s both beautiful and deeply meaningful.
[feast_advanced_jump_to]
🛠 Essential Equipment for Your DIY Woolen Advent Wreath
Gathering your supplies is the first exciting step in bringing your cozy woolen Advent wreath to life. Having everything ready before you start will make the crafting process smooth and enjoyable. Here’s what you’ll need:
- Two Half-Rings or One Full Styrofoam Ring (11.81 inches / 30 cm diameter): A sturdy base is crucial for your wreath. Using two half-rings allows for easier wrapping initially, which you’ll then join, or a single full ring works just as well. This diameter is ideal for a noticeable yet manageable Advent centerpiece.
- Florist Wire: This flexible wire is essential for securely joining the styrofoam rings together if you’re using two halves. It also acts as a temporary stabilizer during the initial wrapping stages.
- U-shaped Pins (Craft Pins): These small pins are perfect for anchoring the yarn to the styrofoam base, ensuring a neat and secure start and finish for your wrapping. They also help in discreetly fastening any yarn cuts during the process.
- 1-2 Skeins of Yarn in Your Chosen Color: The amount of yarn needed can vary based on its thickness and the desired fullness of your wreath. Choose a color or a blend of colors that complements your existing holiday decor or reflects your personal style. Chunky yarn often creates a more dramatic, cozy look.
- Four Candleholders with Mandrels: These holders are designed to be easily inserted into the styrofoam, providing a stable and safe base for your Advent candles.
- 4-8 Small Ornament Decorations or the Numbers 1-4: Personalize your wreath with charming small ornaments, festive baubles, or traditional Advent numbers to mark each week.
- Four Pillar Candles in Complementary Colors: Select candles that beautifully contrast or harmonize with your chosen yarn color. Traditional Advent wreaths often feature three purple and one pink candle, but modern interpretations allow for any color scheme that speaks to you.
- One Decorative Plate: A beautiful plate or tray will serve as the foundation for your finished Advent wreath, protecting your surfaces and enhancing its visual appeal.
- Fresh Fir Brushwood: Not only does fir brushwood add a touch of natural beauty and an authentic festive feel, but it also infuses your home with the classic, invigorating scent of Christmas. Place it as a base between the decorative plate and your woolen wreath.
🪡 Crafting Your Woolen Advent Wreath: A Step-by-Step Tutorial
Now that you have all your materials, let’s begin the fun process of transforming simple items into a beautiful, personalized Advent wreath. Follow these instructions carefully to ensure a stunning and sturdy result.
Step 1: Secure Your Styrofoam Base
If you’re using two half-rings, your first task is to join them together securely to form a complete circular base. Take your florist wire and wrap it around opposite sides of the two half-rings, effectively stitching them together. Don’t pull the wire too tightly at this stage, as you’ll need to adjust or remove it later. These initial wires provide enough stability to prevent the rings from slipping apart when you start wrapping, without creating unnecessary bulk or interference. If you’re using a single full styrofoam ring, you can skip this initial wiring step.
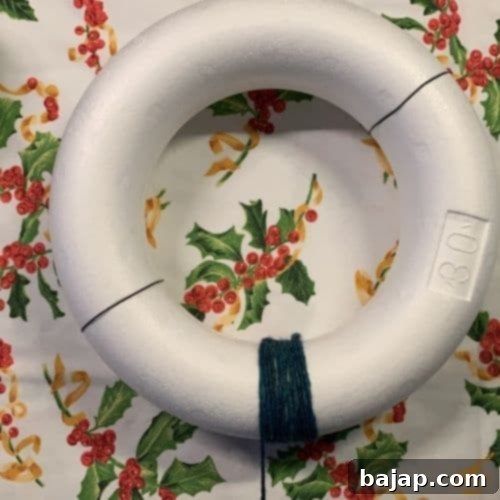
As you progress with the yarn wrapping, you’ll gradually shift or entirely remove these florist wires. This is why it’s important not to secure them too rigidly at the beginning. Once your base is ready, find the end of your yarn (sometimes this can be a mini-adventure!). Form a small loop at the very end of the yarn, then use a U-shaped pin to firmly attach this loop to the underside of your styrofoam wreath. This ensures a clean and stable starting point for your wrapping.
Step 2: The Art of Wrapping Your Wreath
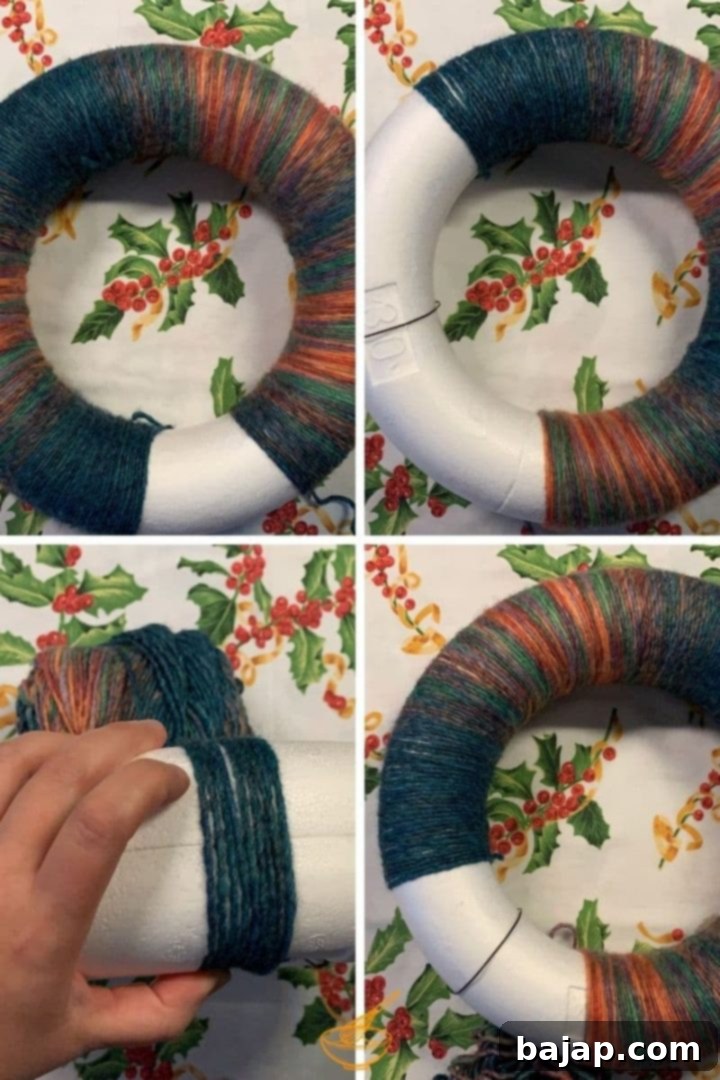
This is where the magic truly happens! Begin wrapping the yarn around the styrofoam wreath, ensuring that each strand is wrapped very tightly and firmly. This is a critical step. If the yarn is wrapped too loosely, you risk the underlying styrofoam showing through, which detracts from the finished aesthetic. More importantly, a loose wrap can make the wreath unstable and prone to shifting. After each new wrap or two, use your fingernail or a small blunt tool to gently push the wrapped threads together. This technique ensures that the yarn lays straight, prevents twisting, and eliminates any unsightly gaps, resulting in a smooth, continuous, and professional-looking woolen surface.
Troubleshooting Tangled Yarn
Even the most experienced crafters encounter tangled yarn – it’s a common occurrence! This has happened to me countless times, and it can be frustrating. If your yarn starts to tangle or gets stuck, don’t lose patience. Instead of struggling with a knot that could lead to more frustration, simply cut the yarn thread. Secure the newly cut end to the bottom of the styrofoam wreath using another U-shaped pin, just as you did at the beginning. Take a moment to untangle the rest of your skein, ensuring it unwinds smoothly. Once the tangle is resolved, start a new piece of yarn, create a loop, and attach it with a U-shaped pin to the bottom of the wreath, continuing exactly where you left off. By anchoring any cuts to the bottom, they remain discreetly hidden, maintaining the wreath’s pristine appearance.
Completing the Wrap
Continue wrapping your yarn around the entire wreath, keeping the tension consistent and pushing the threads together as you go. As you cover more of the styrofoam, you’ll find that the wreath becomes more stable. At this point, you can gradually push the temporary florist wires along the wreath or remove them entirely if they are no longer needed for stability. Once you’ve wrapped the entire circumference of the wreath and are happy with the coverage, cut the yarn. Again, ensure you leave enough length to create a small loop and secure it firmly to the underside of the Advent wreath with a U-shaped pin. This final anchor will prevent the yarn from unraveling and keep your beautiful work intact.
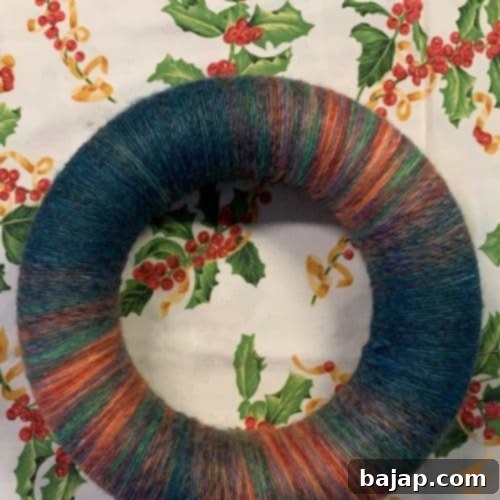
Congratulations! Your beautifully wrapped woolen Advent wreath base is complete!
Step 3: Adding the Candles and Personalized Decorations
With your woolen wreath base complete, it’s time to bring it to life with candles and decorations. This is where your personal style truly shines through. Start by carefully placing your chosen pillar candles onto their mandreled candleholders. These candleholders will then be gently pressed into the styrofoam wreath, ensuring a secure and upright position for each candle.
Candle Color Choices and Symbolism
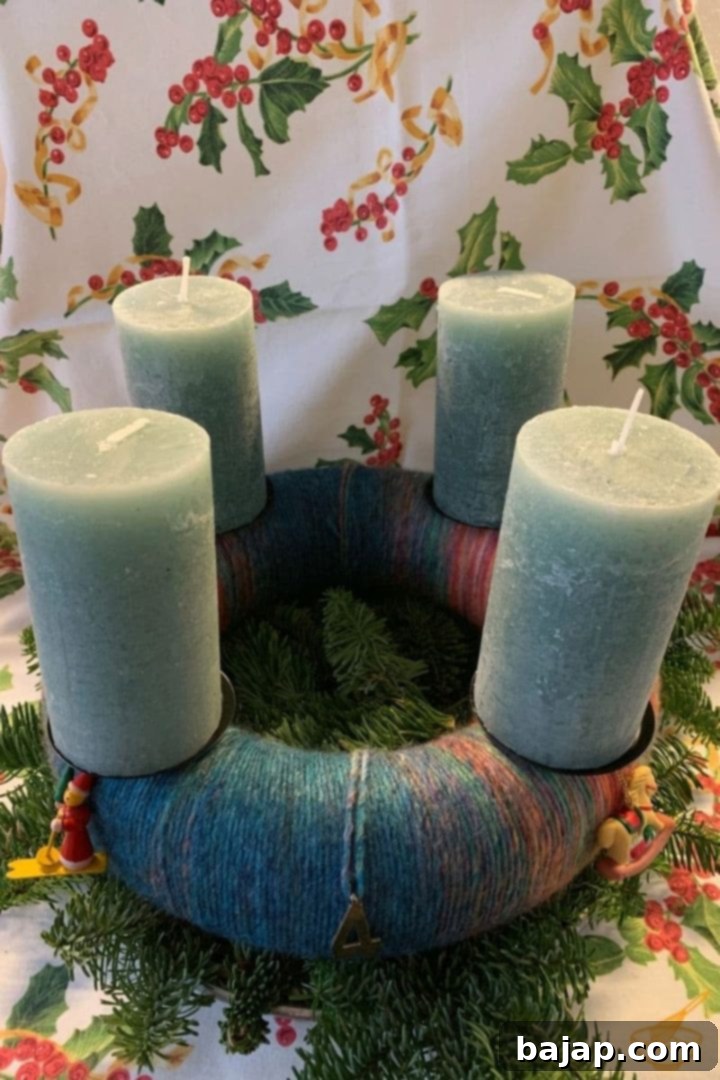
For my Advent wreath, I opted for a collection of beautiful teal-colored candles. This choice offers a refreshing departure from the very traditional Advent wreath, which typically features three purple candles (representing hope, peace, and love) and one pink candle (for joy), often lit in a specific sequence. If you prefer to adhere to this classic symbolism, I recommend selecting a yarn color that incorporates shades of purple and pink to tie everything together beautifully. For those interested in delving deeper into the rich meaning behind the traditional Advent candle colors, you can find a detailed description here.
However, if you’re a fan of unique aesthetics, like me and my teal preference, consider other modern combinations. For instance, using three teal candles and one crisp white candle can create a striking and elegant contrast. The beauty of a DIY project is that you have complete freedom to choose colors that resonate most with you and your home’s decor, making your Advent wreath truly one-of-a-kind.
Decorating Your Woolen Wreath
Now, let’s consider the decorations. The effort you put into wrapping the wool deserves to be highlighted, so I found it important to keep the decorations simple yet impactful, allowing the elegance of the woolen texture to be the star. For this particular Advent wreath, I lovingly rummaged through my collection of wooden Christmas tree decorations from childhood – each piece carrying a special memory. I also rediscovered a set of numbers (1 to 4) that I had saved from a previous Advent wreath project.
I selected four distinct and adorable wooden pendants, each conveniently equipped with a hanging ribbon. This made attachment incredibly simple! I could easily loop the ribbon around the spike of each candle holder before inserting it into the wreath. This method securely attached the pendants and ensured they hung beautifully alongside the candles, creating a cohesive and charming look with minimal effort. The combination of the candles and these sweet, rustic decorations came together quickly and looked utterly adorable.

Next came the numbering. While entirely optional, I adored the idea of incorporating the numbers 1 through 4 to visually mark each week of Advent. I planned to place these numbers evenly between the candles. To achieve this, I prepared four pieces of yarn, all cut to the same length, ensuring consistency. I threaded each yarn through the eyelet of its respective number. Then, I secured the yarn to the bottom of the Advent wreath using a U-shaped pin, allowing the thread to run discreetly along the wreath from the inside to the outside. Because the yarn color perfectly matched the wreath, it was barely visible, creating a seamless integration of the numbers into the design.

Step 4: The Final Touch – Setting the Scene
To truly showcase your stunning woolen Advent wreath and infuse your home with the delightful scents of Christmas, the final step is to prepare its display. Select a beautiful decorative plate or tray that complements your wreath. Arrange fresh fir branches evenly across this plate. For the best visual effect and to maximize the aromatic benefits, allow some of the fir brushwood to gently protrude slightly at the edges, creating a lush, natural border. Once the fir is arranged, carefully center your finished wool Advent wreath on top.

Voila! Your masterpiece is complete. Not only will your handmade woolen Advent wreath be a beautiful centerpiece for your holiday celebrations, but thanks to the fresh fir brushwood, a wonderful, natural Christmas aroma will gently waft through your entire home. It’s the perfect blend of visual charm and sensory delight! Mmmm, truly enchanting! 🤩
Did this detailed tutorial ignite your passion for holiday crafting? Do you adore filling your home with the evocative smells of Christmas? If you answered yes, then you might also love exploring more festive DIY projects! Check out Lynn’s fantastic DIY post for a brilliant tutorial on creating a homemade orange garland – another wonderful way to add natural beauty and fragrance to your holiday decor. Embrace the joy of crafting and make this holiday season truly unforgettable with your own handmade touches!
Related Posts and More Holiday Inspiration
If you enjoyed crafting your DIY woolen Advent wreath and are looking for more ways to infuse your home with festive cheer, explore these related articles for additional holiday ideas and inspiration. From decorating your Christmas tree to finding the perfect Advent calendar, we’ve got you covered!
- How to Decorate a Real Christmas Tree in 11 Steps
- 25 Amazing Ready-made Advent Calendars for Grownups
- These Homemade Advent Calendars for Grown-ups Will Put You in the Proper Christmas Mood
- 8 Christmas Tablescape Ideas for a Festive Christmas Feast
