Irresistible No-Bake Candy Cane Oreo Cake Pops: The Perfect Easy Holiday Dessert
Are you searching for that magical holiday dessert that’s quick to prepare, requires no baking, and is guaranteed to impress? Look no further! These sensational No-Bake Candy Cane Oreo Cake Pops are the ultimate festive treat, combining delightful flavors and textures in every bite.
Imagine the harmonious blend of your favorite Oreo cookies, crushed into a tender, rich base, then infused with vibrant, crunchy candy cane bits and enrobed in decadent dark chocolate. This isn’t just a dessert; it’s a culinary experience that captures the very essence of the holiday season.

An incredible thought, isn’t it? Each bite offers a delightful dance of flavor and texture on your tongue. The smooth, creamy texture of the Oreo cookie base gives way to small, snow crystal-like splinters of peppermint, creating a captivating crunch. Yes, this is the taste of Christmas, expertly crafted into these extraordinary no-bake Oreo candy cane cake pops!
I’ve always been captivated by the idea of creating a dessert that perfectly balances a soft, cake-like interior with an exciting, crunchy surprise. After numerous attempts, I finally achieved this with the brilliant combination of classic Oreo cookies and finely crushed candy canes. The result was nothing short of spectacular! These cake pops vanished so quickly from my kitchen that I barely had time to admire them. In fact, they were devoured at such an astonishing pace that I immediately had to prepare another batch. And, I must confess, my own enthusiastic consumption certainly played a role in their rapid disappearance! 😊 They truly are that good.
Whether you’re hosting a festive gathering, looking for a thoughtful homemade gift, or simply craving a sweet escape, these candy cane Oreo cake pops are your answer. Their vibrant appearance and irresistible taste make them a showstopper on any holiday dessert table.
[feast_advanced_jump_to]
🥘 Essential Ingredients for Your Candy Cane Oreo Cake Pops
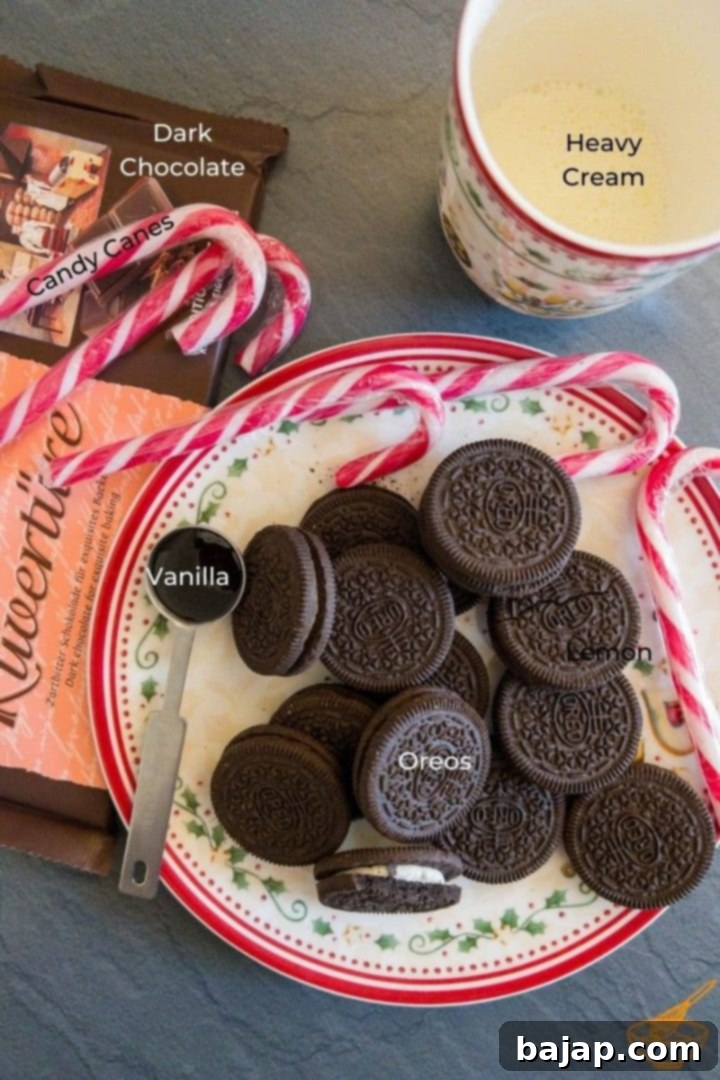
Crafting these delectable cake pops requires just a few simple ingredients, each playing a crucial role in achieving that perfect balance of flavor and texture. Here’s what you’ll need:
- Candy Canes: These iconic holiday treats provide the signature peppermint flavor and a delightful, surprising crunch. For the best quality, consider organic options. If candy canes aren’t available or you prefer a different flavor, any hard candy (like peppermint candies or even butterscotch for a caramel twist) can be substituted. Just ensure it’s a flavor that complements chocolate and cookies.
- Oreo Cookies: The heart of these cake pops! Oreos are ideal due to their distinct chocolate cookie and creamy filling, which binds beautifully when crushed. While any cream-filled cookie can work, the classic Oreo flavor is unparalleled here. The cream filling helps create a moist, truffle-like texture when mixed.
- Dark Chocolate Couverture: Using a high-quality dark chocolate couverture is key for a luxurious coating and to balance the sweetness of the Oreos and candy canes. Dark chocolate (around 60-70% cocoa) pairs exceptionally well with the minty notes and the richness of the cookies. If you’re experimenting with different cookies, choose a chocolate that complements its flavor profile – milk chocolate for a sweeter treat, or white chocolate for a milder contrast.
- Vanilla Extract: A touch of vanilla extract enhances all the other flavors, adding depth and warmth. You can also use ground vanilla for a more intense aroma. For other cookie variations, consider gingerbread, caramel, or rum essence to elevate the taste.
- Heavy Whipping Cream: This is what binds our cake pop mixture together, creating that wonderfully rich, dense, and truffle-like consistency. It adds necessary moisture and creaminess, making the cake pops irresistible.
Looking for premium chocolate? Get your chocolate couverture at Prime Chocolate and save 10 % with the code ThankYouNora.
🍽 Essential Equipment for Crafting Your Perfect Cake Pops
Having the right tools makes the preparation of these no-bake delights even easier and more enjoyable. Here’s what you’ll need in your kitchen arsenal:
- Cake Pop Equipment:
- Cake Pop Silicone Mold: This is essential for achieving perfectly spherical cake pops. Silicone molds are fantastic because they are flexible, making it incredibly easy to release the frozen cake pops without breakage. Look for a two-part mold that helps shape the ball around the stick.
- Lollipop Sticks (Cake Pop Sticks): These sturdy sticks transform your truffles into delightful handheld treats. Ensure they are long enough to provide a good grip and support the cake pop.
- Food Processor: Your best friend for this recipe! A good food processor will quickly and efficiently crush the candy canes and Oreo cookies into fine crumbs, saving you a lot of time and effort compared to doing it manually.
- Water Bath (or Bain-Marie): This gentle heating method is crucial for melting chocolate couverture evenly and preventing it from seizing or burning. It involves placing a heatproof bowl over a pot of simmering water, allowing the steam to slowly melt the chocolate.
- Medium Size Bowl: For mixing your crushed Oreo and candy cane mixture with the other liquid ingredients.
- Electric Hand Mixer: While a wooden spoon can work, an electric hand mixer ensures your cake pop dough is thoroughly combined and homogenous, leading to a smoother, more consistent texture.
- Tablespoon or Cookie Scoop: A cookie scoop is highly recommended for portioning the mixture evenly into the cake pop molds. This ensures all your cake pops are roughly the same size and cook/chill uniformly.
🔪 Step-by-Step Guide to Making Your No-Bake Candy Cane Oreo Cake Pops
Follow these detailed instructions to create your beautiful and delicious holiday cake pops. Precision and patience are your best tools here!
-
1. Prepare Your Chocolate Water Bath: Before anything else, set up your water bath (bain-marie) and begin melting your dark chocolate couverture. To do this, simply fill a small saucepan with about 1-2 inches of water and bring it to a gentle simmer. Place a heatproof bowl on top of the saucepan, ensuring the bottom of the bowl does not touch the water. Add your 5.3 oz (150g) dark chocolate couverture to the bowl. Stir occasionally until the chocolate is smooth and fully melted. This proactive step ensures your chocolate is perfectly liquid and ready when you need it later, saving precious time.
5.3 oz Dark chocolate couverture -
2. Crush the Candy Canes: Now, for a moment of festive noise! Place your 5 pieces of candy canes into a food processor. Pulse until they are finely crushed into small crystals and some slightly larger bits. This will create a delightful texture contrast in your cake pops. A word of caution: this process can be quite loud, so choose a time when loud noises won’t disturb anyone, especially if you have little ones napping! The goal is a mix of fine powder and small crunchy pieces, like “snow crystals.”
5 pieces Candy canes -
3. Reserve Candy Cane Crumbs for Garnish: Once crushed, take approximately one tablespoon of these vibrant candy cane crystals and set them aside in a small bowl. These will be used later as a beautiful and delicious garnish for your finished cake pops.
-
4. Combine Oreos and Candy Canes: With the candy cane crumbs still in the food processor, add your 14 Oreo cookies. Process them together with the remaining candy cane crystals until the Oreos are finely crushed and well combined with the peppermint bits. The creamy filling of the Oreos will help bind the mixture, creating a rich base. The noise might pick up again, but it’s a small price to pay for these delightful treats!
14 Oreo cookies -
5. Prepare the Cake Pop Base Mixture: Transfer the finely crushed Oreo and candy cane crumbs into a medium-sized mixing bowl. Ensure it’s large enough to comfortably mix the additional ingredients.
-
6. Incorporate Vanilla and Chocolate: To the cookie and candy cane crumbs, add 1 teaspoon of vanilla extract and exactly half of your pre-melted dark chocolate. This is a crucial step: only use half of the chocolate at this stage! The remaining melted chocolate is reserved for coating your cake pops later. Adding too much now will make the mixture too wet and difficult to handle, and you won’t have enough for dipping. So, resist the urge to pour it all in!
1 teaspoon Vanilla extract -
7. Mix Until Combined: Using an electric hand mixer is highly recommended for this step, as it helps create a more homogeneous and consistent mixture, which is vital for perfect cake pop texture. Mix the ingredients thoroughly until they are well combined. The mixture will start to come together but might still be a bit crumbly.
-
8. Add Heavy Whipping Cream: Now, add the 2 ¾ tablespoons of heavy whipping cream to the mixture. Continue mixing with your electric hand mixer until a dense, sticky dough forms. This is the stage where the mixture transforms into a workable consistency, perfect for shaping into cake pops. Scrape down the sides of the bowl to ensure everything is fully incorporated.
2 ¾ tablespoon Heavy whipping cream -
9. Chill the Mixture: To make handling the mixture much easier and prevent it from sticking, chill it in the refrigerator for at least 15 minutes. This cooling period firms up the dough, making it less sticky and ideal for filling your molds. Don’t skip this step!
-
10. Fill the Molds and Insert Sticks: Retrieve your chilled dough. Lay the bottom half of your silicone cake pop mold (the one without the holes) on a clean countertop. Using a tablespoon or, preferably, a cookie scoop, evenly distribute the cake pop mixture into each cavity of the mold. A cookie scoop is excellent for ensuring consistent sizing. Once filled, gently place the top half of the silicone mold (the one with the holes) over the bottom. Now, carefully insert a lollipop stick into each tiny hole, pushing it far enough into the mixture so that the cake pop ball is securely attached and won’t easily break off later. This creates a sturdy foundation for your cake pops.
-
11. Freeze for Firmness: Transfer the filled silicone mold to the freezer and let it chill for 30-60 minutes. Freezing is essential to make the cake pops firm enough to be easily removed from the mold and to hold their shape during the dipping process.
-
12. Dip in Chocolate: Once the cake pops are thoroughly hardened (a quick check: try gently lifting the silicone top; if the stick feels firmly set, they’re ready!), carefully remove the solid balls from the mold. Reheat the remaining half of your melted dark chocolate couverture slightly if it has cooled too much (a few seconds in the microwave or over the bain-marie). Dip each cake pop into the velvety melted chocolate, ensuring it’s fully coated.
-
13. Garnish with Candy Cane Crystals: Gently tap the stick to allow any excess chocolate to drip off. While the chocolate is still wet, immediately press the top of the coated cake pop into the candy cane crystals you set aside earlier. This ensures the peppermint pieces adhere beautifully to the chocolate. For a consistent look, you can also roll the entire cake pop gently in the crystals, or sprinkle them on for a more controlled design.
-
14. Allow to Set: Set the finished, decorated cake pops aside to solidify. You can stand them upright in a tall glass jar, a styrofoam block, or a dedicated cake pop stand. Ensure they are stable and won’t fall over as the chocolate hardens.
-
15. Final Chill and Enjoy: For the best texture and firmness, allow your beautiful Oreo candy cane cake pops to set completely in the refrigerator for at least 15-30 minutes before serving. Then, it’s time to indulge! Enjoy your festive, homemade treats!

🌡️ Storage Tips for Your Candy Cane Oreo Cake Pops
Proper storage ensures your delightful no-bake candy cane Oreo cake pops remain fresh and delicious for longer. Here’s how to keep them at their best:
- Refrigeration: These cake pops are best stored in an airtight container in the refrigerator. When stored correctly, they will maintain their deliciousness and firm texture for up to 3-5 days. Be sure to layer them with parchment paper if stacking to prevent sticking.
- Freezing: For longer enjoyment, these cake pops are perfectly freezable! Arrange the fully set cake pops in a single layer on a baking sheet and freeze until solid (about 1-2 hours). Once frozen, transfer them to a freezer-safe airtight container or bag. They can be stored in the freezer for up to two months. When you’re ready to enjoy them, simply transfer them to the refrigerator to thaw for a few hours. They’ll be just as scrumptious as freshly made!
💭 Top Tip: No Mold? Make No-Bake Oreo Truffles!
Don’t have a silicone cake pop mold? No problem! You can easily transform this recipe into equally delicious no-bake Oreo truffles. This is a fantastic alternative if you want to skip the sticks but still enjoy the incredible flavor combination.
Here’s how to make them:
- After chilling the Oreo and candy cane mixture in the refrigerator for the initial 15 minutes (as instructed in step 9), prepare a pre-cooled surface. A silicone mat or a baking sheet chilled in the refrigerator or freezer for about 10-15 minutes works perfectly. This prevents the truffles from sticking and melting as you work.
- Using a teaspoon or a small cookie scoop, portion out tablespoon-sized pieces of the chilled truffle mixture.
- Working quickly, roll each portion into a smooth ball between your palms. To keep your hands clean and prevent the mixture from sticking, I highly recommend wearing food-safe gloves for this step.
- Once you have your truffle balls, prepare the remaining melted chocolate. You can dip your gloved hand into the melted chocolate and then roll the truffle ball in your “chocolate-coated hands,” gently coating the Oreo candy cane ball evenly with chocolate. Alternatively, use two forks to gently lower and lift each truffle into the melted chocolate, allowing excess to drip off.
- Immediately place the chocolate-covered Oreo truffle onto your cooled surface. While the chocolate is still wet, generously sprinkle it with the reserved candy cane crystals for a festive finish.
- Allow these beautiful truffles to solidify in the refrigerator for at least 30 minutes, or until the chocolate is firm. Store them in an airtight container in the refrigerator. These elegant no-bake truffles are perfect for sharing or enjoying as a luxurious snack!
If you make this recipe, let me know how you liked it by ★★★★★ star rating it and leaving a comment below. This would be awesome! You can also sign up for our Newsletter or follow me on Pinterest or Instagram and share your creation with me. Just tag me @combinegoodflavors and hashtag #combinegoodflavors, so I don’t miss it.
📖 Recipe: No-bake Candy Cane Oreo Cake Pops

No-bake Candy Cane Oreo Cake Pops
By Nora
Save RecipeSaved!
Pin Recipe
Equipment
-
Cake pop silicone mold
-
Cake pop sticks
-
Baine Marie for melting the couverture
-
medium sized bowls
-
Electric hand mixer
-
Cookie scoop or Tablespoon
-
Food processor
